mocha是一个功能丰富的javascript测试框架,运行在node.js和浏览器中,使异步测试变得简单有趣。Mocha测试连续运行,允许灵活和准确的报告,同时将未捕获的异常映射到正确的测试用例。在Github上托管。
支持者
找到mocha有用吗?成为支持者,每月捐款支持mocha。
![]()
![]()
![]()
![]()
![]()
![]()
![]()
![]()
![]()
![]()
![]()
![]()
![]()
![]()
![]()
![]()
![]()
![]()
![]()
![]()
![]()
![]()
![]()
![]()
![]()
![]()
![]()
![]()
![]()
![]()
赞助商
在工作中使用mocha?询问您的经理或营销团队是否有人帮助支持我们的项目。您公司的徽标也将显示在npmjs.com和我们的GitHub存储库中。
![]()
![]()
![]()
![]()
![]()
![]()
![]()
![]()
![]()
![]()
![]()
![]()
![]()
![]()
![]()
![]()
特征
- 服务器
- 浏览器支持
- 简单的异步支持,包括承诺
- 测试覆盖率报告
- 字符串差异支持
- 用于运行测试的JavaScript API
- CI支持的正确退出状态等
- 自动检测并禁用非ttys的着色
- 将未捕获的异常映射到正确的测试用例
- 异步测试超时支持
- 测试重试支持
- 测试特定的超时
- 咆哮通知支持
- 报告测试持续时间
- 强调慢速测试
- 文件观察者支持
- 全局变量泄漏检测
- 可选地运行与正则表达式匹配的测试
- 自动退出以防止“挂起”活动循环
- 轻松元生成套件和测试用例
- mocha.opts文件支持
- 可点击的套件标题,用于过滤测试执行
- 节点调试器支持
- 检测到多个来电
done() - 使用你想要的任何断言库
- 可扩展的报告,与9个以上的记者捆绑在一起
- 可扩展测试DSL或“接口”
- 每个钩子之前,之后,之前,之后
- 任意的翻译支持(咖啡脚本等)
- TextMate包
- 和更多!
目录
- 服务器
- 安装
- 开始
- 检测到多个呼叫
done() - 断言
- 异步代码
- 同步代码
- 箭头函数
- 钩子
- 未决试验
- 排他性试验
- 包容性测试
- 重试测试
- 动态生成测试
- 超时
- DIFFS
- 用法
- 接口
- 记者
- 在浏览器中运行Mocha
mocha.opts- 该
test/目录 - 编辑插件
- 例子
- 测试摩卡
- 更多信息
安装
使用NPM全局安装:
$ npm install --global mocha
也可以作为项目的依赖进行安装:
$ npm install --save-dev mocha
安装mocha> = v3.0.0,
npm的版本应该> = v2.14.2。除此,确保使用Node.js的版本> = v4来运行mocha
开始
$ npm install mocha
$ mkdir test
$ $EDITOR test/test.js # or open with your favorite editor
在编辑器中输入:
var assert = require('assert');
describe('Array', function() {
  describe('#indexOf()', function() {
    it('should return -1 when the value is not present', function() {
      assert.equal([1,2,3].indexOf(4), -1);
    });
  });
});
然后在终端中运行:
$ ./node_modules/mocha/bin/mocha

  Array
    #indexOf()
      ✓ should return -1 when the value is not present


  1 passing (9ms)
在的package.json中设置一个测试脚本:
"scripts": {
    "test": "mocha"
  }
然后运行:
$ npm test
检测到多个呼叫 done()
如果使用基于回调的异步测试,如果done()多次调用Mocha,则会抛出错误。这对于捕获意外的双重回调非常方便。
it('double done', function(done) {
  // Calling `done()` twice is an error
  setImmediate(done);
  setImmediate(done);
});
运行上面的测试将给出以下错误消息:
$ ./node_modules/.bin/mocha mocha.test.js


  ✓ double done
  1) double done

  1 passing (6ms)
  1 failing

  1) double done:
     Error: done() called multiple times
      at Object.<anonymous> (mocha.test.js:1:63)
      at require (internal/module.js:11:18)
      at Array.forEach (<anonymous>)
      at startup (bootstrap_node.js:187:16)
      at bootstrap_node.js:608:3
断言
mocha允许你使用任意你喜欢的断言库,在上面的例子中,我们使用了Node.js的内置的断言模块作为断言。如果能够抛出一个错误,它就能够运行。这意味着你能使用下面的这些仓库,比如:
- should.js - BDD风格贯穿始终
- expect.js -
expect()样式断言 - chai -
expect(),assert()和should风格的断言 - better-assert - C风格的自文档化的
assert() - unexpected - “可扩展的BDD断言工具”
异步代码
使用Mocha测试异步代码并不简单!只需在测试完成后调用回调。通过添加一个回调(通常命名done)it(),Mocha将知道它应该等待调用此函数来完成测试。此回调接受Error实例(或其子类)或伪值; 其他任何事情都会导致测试失败。
describe('User', function() {
  describe('#save()', function() {
    it('should save without error', function(done) {
      var user = new User('Luna');
      user.save(function(err) {
        if (err) done(err);
        else done();
      });
    });
  });
});
为了使事情变得更容易,done()回调也接受一个Error实例(即new Error()),所以我们可以直接使用它:
describe('User', function() {
  describe('#save()', function() {
    it('should save without error', function(done) {
      var user = new User('Luna');
      user.save(done);
    });
  });
});
使用承诺
或者,done()您可以返回Promise,而不是使用回调。如果您正在测试的API返回promises而不是回调,这将非常有用:
beforeEach(function() {
  return db.clear()
    .then(function() {
      return db.save([tobi, loki, jane]);
    });
});

describe('#find()', function() {
  it('respond with matching records', function() {
    return db.find({ type: 'User' }).should.eventually.have.length(3);
  });
});
后一个例子使用Chai作为承诺用于流利的承诺断言。
在Mocha v3.0.0及更新版本中,返回a Promise 和调用done()将导致异常,因为这通常是一个错误:
const assert = require('assert');

it('should complete this test', function (done) {
  return new Promise(function (resolve) {
    assert.ok(true);
    resolve();
  })
    .then(done);
});
上述测试将失败Error: Resolution method is overspecified. Specify a callback *or* return a Promise; not both.。在v3.0.0之前的版本中,done()有效地忽略了调用。
使用async / await
如果你的js运行环境支持async / await,你也可以像下面这样写异步测试。
beforeEach(async function() {
  await db.clear();
  await db.save([tobi, loki, jane]);
});

describe('#find()', function() {
  it('responds with matching records', async function() {
    const users = await db.find({ type: 'User' });
    users.should.have.length(3);
  });
});
同步代码
在测试同步代码时,省略回调,Mocha将自动继续进行下一次测试。
describe('Array', function() {
  describe('#indexOf()', function() {
    it('should return -1 when the value is not present', function() {
      [1,2,3].indexOf(5).should.equal(-1);
      [1,2,3].indexOf(0).should.equal(-1);
    });
  });
});
箭头功能
不鼓励将箭头函数(“lambdas”)传递给Mocha。Lambdas词法绑定this,无法访问Mocha上下文。例如,以下代码将失败:
describe('my suite', () => {
  it('my test', () => {
    // should set the timeout of this test to 1000 ms; instead will fail
    this.timeout(1000);
    assert.ok(true);
  });
});
如果您不需要使用 Mocha的上下文,lambdas应该可以工作。但是,如果最终需要,结果将更难以重构。
钩
其默认“BDD”式接口,mocha提供钩before(),after(),beforeEach(),和afterEach()。这些应该用于设置前置条件并在测试后进行清理。
describe('hooks', function() {

  before(function() {
    // runs before all tests in this block
  });

  after(function() {
    // runs after all tests in this block
  });

  beforeEach(function() {
    // runs before each test in this block
  });

  afterEach(function() {
    // runs after each test in this block
  });

  // test cases
});
测试可以在钩子之前,之后或穿插时出现。钩子将按其定义的顺序运行,视情况而定; 所有
before()钩子运行(一次),然后任何beforeEach()钩子,测试,任何afterEach()钩子,最后after()钩子(一次)。
描述钩子
可以使用可选描述调用任何挂钩,从而更容易查明测试中的错误。如果为钩子指定了一个命名函数,则在没有提供描述的情况下将使用该名称。
beforeEach(function() {
  // beforeEach hook
});

beforeEach(function namedFun() {
  // beforeEach:namedFun
});

beforeEach('some description', function() {
  // beforeEach:some description
});
异步挂钩
所有的钩子(before(),after(),beforeEach(),afterEach())可以是同步或异步为好,表现就像一个常规的测试用例。例如,您可能希望在每次测试之前使用虚拟内容填充数据库:
describe('Connection', function() {
  var db = new Connection,
    tobi = new User('tobi'),
    loki = new User('loki'),
    jane = new User('jane');

  beforeEach(function(done) {
    db.clear(function(err) {
      if (err) return done(err);
      db.save([tobi, loki, jane], done);
    });
  });

  describe('#find()', function() {
    it('respond with matching records', function(done) {
      db.find({type: 'User'}, function(err, res) {
        if (err) return done(err);
        res.should.have.length(3);
        done();
      });
    });
  });
});
根级挂钩
您也可以选择任何文件并添加“root”级别挂钩。例如,beforeEach()在所有describe()块之外添加。这将导致回调beforeEach()在任何测试用例之前运行,无论它存在于哪个文件中(这是因为Mocha有一个隐含的 describe()块,称为“根套件”)。
beforeEach(function() {
  console.log('before every test in every file');
});
延迟根套件
如果您需要在运行任何套件之前执行异步操作,则可能会延迟根套件。mocha用--delay旗帜运行。这将附加一个特殊的回调函数run(),到全局上下文:
setTimeout(function() {
  // do some setup

  describe('my suite', function() {
    // ...
  });

  run();
}, 5000);
待测试
“待定” - 在“有人应该最终编写这些测试用例”中 - 测试用例只是没有回调的情况:
describe('Array', function() {
  describe('#indexOf()', function() {
    // pending test below
    it('should return -1 when the value is not present');
  });
});
待测试将包含在测试结果中,并标记为待定。待定测试不被视为失败测试。
独家测试
排他性功能允许您通过附加到函数来仅运行指定的套件或测试用例.only()。这是仅执行特定套件的示例:
describe('Array', function() {
  describe.only('#indexOf()', function() {
    // ...
  });
});
注意:仍将执行所有嵌套套件。
以下是执行单个测试用例的示例:
describe('Array', function() {
  describe('#indexOf()', function() {
    it.only('should return -1 unless present', function() {
      // ...
    });

    it('should return the index when present', function() {
      // ...
    });
  });
});
在v3.0.0之前,.only()使用字符串匹配来决定执行哪些测试。从v3.0.0开始,情况就不再如此。在v3.0.0或更高版本中,.only()可以多次使用来定义要运行的测试子集:
describe('Array', function() {
  describe('#indexOf()', function() {
    it.only('should return -1 unless present', function() {
      // this test will be run
    });

    it.only('should return the index when present', function() {
      // this test will also be run
    });

    it('should return -1 if called with a non-Array context', function() {
      // this test will not be run
    });
  });
});
您也可以选择多个套房:
describe('Array', function() {
  describe.only('#indexOf()', function() {
    it('should return -1 unless present', function() {
      // this test will be run
    });

    it('should return the index when present', function() {
      // this test will also be run
    });
  });

  describe.only('#concat()', function () {
    it('should return a new Array', function () {
      // this test will also be run
    });
  });

  describe('#slice()', function () {
    it('should return a new Array', function () {
      // this test will not be run
    });
  });
});
但测试将优先:
describe('Array', function() {
  describe.only('#indexOf()', function() {
    it.only('should return -1 unless present', function() {
      // this test will be run
    });

    it('should return the index when present', function() {
      // this test will not be run
    });
  });
});
注意:钩子(如果存在)仍将执行。
注意不要使用
.only()版本控制的用法,除非你真的是这个意思!为此,可以使用--forbid-only持续集成测试命令(或git precommit hook)中的选项运行mocha 。
包容性测试
此功能与之相反.only()。通过附加.skip(),您可以告诉Mocha简单地忽略这些套件和测试用例。跳过的任何内容都将被标记为待处理,并按此报告。这是跳过整个套件的示例:
describe('Array', function() {
  describe.skip('#indexOf()', function() {
    // ...
  });
});
或者特定的测试用例:
describe('Array', function() {
  describe('#indexOf()', function() {
    it.skip('should return -1 unless present', function() {
      // this test will not be run
    });

    it('should return the index when present', function() {
      // this test will be run
    });
  });
});
最佳实践:使用
.skip()而不是评论测试。
您也可以在运行时跳过使用this.skip()。如果测试需要预先无法检测到的环境或配置,则运行时跳过是合适的。例如:
it('should only test in the correct environment', function() {
  if (/* check test environment */) {
    // make assertions
  } else {
    this.skip();
  }
});
上述测试将报告为待定。同样重要的是要注意调用this.skip()将有效中止测试。
Best practice: To avoid confusion, do not execute further instructions in a test or hook after calling
this.skip().
Contrast the above test with the following code:
it('should only test in the correct environment', function() {
  if (/* check test environment */) {
    // make assertions
  } else {
    // do nothing
  }
});
Because this test does nothing, it will be reported as passing.
Best practice: Don’t do nothing! A test should make an assertion or use
this.skip().
To skip multiple tests in this manner, use this.skip() in a “before” hook:
before(function() {
  if (/* check test environment */) {
    // setup code
  } else {
    this.skip();
  }
});
Before Mocha v3.0.0,
this.skip()was not supported in asynchronous tests and hooks.
Retry Tests
You can choose to retry failed tests up to a certain number of times. This feature is designed to handle end-to-end tests (functional tests/Selenium…) where resources cannot be easily mocked/stubbed. It’s not recommended to use this feature for unit tests.
This feature does re-run beforeEach/afterEach hooks but not before/after hooks.
NOTE: Example below was written using Selenium webdriver (which overwrites global Mocha hooks for Promise chain).
describe('retries', function() {
  // Retry all tests in this suite up to 4 times
  this.retries(4);

  beforeEach(function () {
    browser.get('http://www.yahoo.com');
  });

  it('should succeed on the 3rd try', function () {
    // Specify this test to only retry up to 2 times
    this.retries(2);
    expect($('.foo').isDisplayed()).to.eventually.be.true;
  });
});
Dynamically Generating Tests
鉴于Mocha使用Function.prototype.call和函数表达式来定义套件和测试用例,因此可以直接动态生成测试。不需要特殊的语法 - 普通的'JavaScript'可用于实现类似于“参数化”测试的功能,您可能已经在其他框架中看到过。
请看以下示例:
var assert = require('chai').assert;

function add() {
  return Array.prototype.slice.call(arguments).reduce(function(prev, curr) {
    return prev + curr;
  }, 0);
}

describe('add()', function() {
  var tests = [
    {args: [1, 2],       expected: 3},
    {args: [1, 2, 3],    expected: 6},
    {args: [1, 2, 3, 4], expected: 10}
  ];

  tests.forEach(function(test) {
    it('correctly adds ' + test.args.length + ' args', function() {
      var res = add.apply(null, test.args);
      assert.equal(res, test.expected);
    });
  });
});
上面的代码将生成一个包含三个规范的套件:
$ mocha

  add()
    ✓ correctly adds 2 args
    ✓ correctly adds 3 args
    ✓ correctly adds 4 args
测试持续时间
许多记者将显示测试持续时间,以及标记缓慢的测试,如“spec”记者所示:

要调整被认为“慢”的东西,您可以使用以下slow()方法:
describe('something slow', function() {
  this.slow(10000);

  it('should take long enough for me to go make a sandwich', function() {
    // ...
  });
});
超时
套房级
套件级超时可应用于整个测试“套件”,或通过其禁用this.timeout(0)。这将由所有嵌套套件和不覆盖该值的测试用例继承。
describe('a suite of tests', function() {
  this.timeout(500);

  it('should take less than 500ms', function(done){
    setTimeout(done, 300);
  });

  it('should take less than 500ms as well', function(done){
    setTimeout(done, 250);
  });
})
测试级别
也可以应用特定于测试的超时,或者this.timeout(0)一起使用以禁用超时:
it('should take less than 500ms', function(done){
  this.timeout(500);
  setTimeout(done, 300);
});
胡克级
也可以应用挂钩级别超时:
describe('a suite of tests', function() {
  beforeEach(function(done) {
    this.timeout(3000); // A very long environment setup.
    setTimeout(done, 2500);
  });
});
同样,用于this.timeout(0)禁用挂钩的超时。
在v3.0.0或更高版本中,传递给
this.timeout()大于最大延迟值的参数将导致禁用超时。
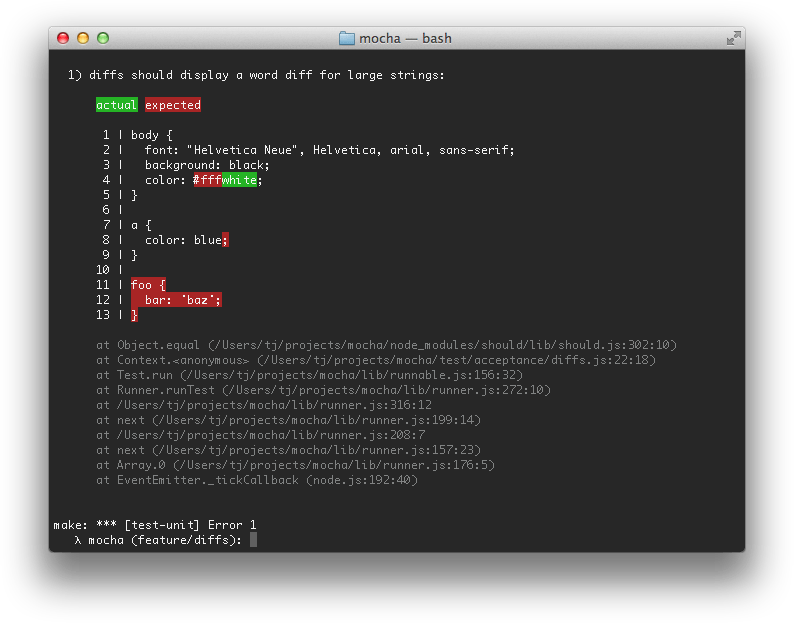
的diff
Mocha支持断言库中任何抛出的s err.expected和err.actual属性AssertionError。mocha将尝试显示预期内容与断言实际看到的内容之间的差异。这是一个“字符串”差异的例子:
用法
  Usage: mocha [debug] [options] [files]


  Options:

    -V, --version                           output the version number
    -A, --async-only                        force all tests to take a callback (async) or return a promise
    -c, --colors                            force enabling of colors
    -C, --no-colors                         force disabling of colors
    -G, --growl                             enable growl notification support
    -O, --reporter-options <k=v,k2=v2,...>  reporter-specific options
    -R, --reporter <name>                   specify the reporter to use
    -S, --sort                              sort test files
    -b, --bail                              bail after first test failure
    -d, --debug                             enable node's debugger, synonym for node --debug
    -g, --grep <pattern>                    only run tests matching <pattern>
    -f, --fgrep <string>                    only run tests containing <string>
    -gc, --expose-gc                        expose gc extension
    -i, --invert                            inverts --grep and --fgrep matches
    -r, --require <name>                    require the given module
    -s, --slow <ms>                         "slow" test threshold in milliseconds [75]
    -t, --timeout <ms>                      set test-case timeout in milliseconds [2000]
    -u, --ui <name>                         specify user-interface (bdd|tdd|qunit|exports)
    -w, --watch                             watch files for changes
    --check-leaks                           check for global variable leaks
    --full-trace                            display the full stack trace
    --compilers <ext>:<module>,...          use the given module(s) to compile files
    --debug-brk                             enable node's debugger breaking on the first line
    --globals <names>                       allow the given comma-delimited global [names]
    --es_staging                            enable all staged features
    --file <file>                           include a file to be ran during the suite [file]
    --harmony<_classes,_generators,...>     all node --harmony* flags are available
    --preserve-symlinks                     Instructs the module loader to preserve symbolic links when resolving and caching modules
    --icu-data-dir                          include ICU data
    --inline-diffs                          display actual/expected differences inline within each string
    --inspect                               activate devtools in chrome
    --inspect-brk                           activate devtools in chrome and break on the first line
    --interfaces                            display available interfaces
    --no-deprecation                        silence deprecation warnings
    --exit                                  force shutdown of the event loop after test run: mocha will call process.exit
    --no-timeouts                           disables timeouts, given implicitly with --debug
    --no-warnings                           silence all node process warnings
    --opts <path>                           specify opts path
    --perf-basic-prof                       enable perf linux profiler (basic support)
    --napi-modules                          enable experimental NAPI modules
    --prof                                  log statistical profiling information
    --log-timer-events                      Time events including external callbacks
    --recursive                             include sub directories
    --reporters                             display available reporters
    --retries <times>                       set numbers of time to retry a failed test case
    --throw-deprecation                     throw an exception anytime a deprecated function is used
    --trace                                 trace function calls
    --trace-deprecation                     show stack traces on deprecations
    --trace-warnings                        show stack traces on node process warnings
    --use_strict                            enforce strict mode
    --watch-extensions <ext>,...            additional extensions to monitor with --watch
    --delay                                 wait for async suite definition
    --allow-uncaught                        enable uncaught errors to propagate
    --forbid-only                           causes test marked with only to fail the suite
    --forbid-pending                        causes pending tests and test marked with skip to fail the suite
    -h, --help                              output usage information


  Commands:

    init <path>  initialize a client-side mocha setup at <path>
-w, --watch
在CWD中执行对JavaScript更改的测试,最初一次。
--exit / --no-exit
在Mocha v4.0.0中更新
在版本v4.0.0 之前,默认情况下,一旦完成执行所有测试,Mocha将强制其自己的进程退出。这种行为会带来一系列潜在问题; 它表示测试(或固定装置,线束,被测代码等),这些测试不能在自身正常后进行清理。最终,“脏”测试可以(但不总是)导致假阳性或假阴性结果。
如果服务器仍然在端口上监听,或者套接字仍处于打开状态等,“挂”最常表现为它。它也可能像失控setInterval(),甚至Promise是永不满足的错误。
v4.0.0中的默认行为是--no-exit以前的行为--exit。
“解决”问题的最简单方法是简单地传递--exit给Mocha进程。它可以是耗时的调试,因为它是哪里的问题并不总是显而易见的,但它是建议这样做。
为了确保您的测试不会让人感到困惑,这里有一些入门的想法:
- 请参阅Node.js指南以进行调试
- 使用新
async_hooksAPI(示例) - 尝试像为什么节点运行一样的东西
- 使用
.only直到找到导致Mocha挂起的测试
--compilers
在Mocha v4.0.0中更新
--compilers自Mocha v4.0.0起已弃用。请参阅进一步的解释和解决方法。
CoffeeScript is no longer supported out of the box. CS and similar transpilers may be used by mapping the file extensions (for use with --watch) and the module name. For example --compilers coffee:coffee-script with CoffeeScript 1.6- or --compilers coffee:coffee-script/register with CoffeeScript 1.7+.
About Babel
If your ES6 modules have extension .js, you can npm install --save-dev babel-register and use mocha --require babel-register; --compilers is only necessary if you need to specify a file extension.
-b, --bail
Only interested in the first exception? use --bail!
-d, --debug
Enables node’s debugger support, this executes your script(s) with node debug <file ...> allowing you to step through code and break with the debugger statement. Note the difference between mocha debug and mocha --debug: mocha debug will fire up node’s built-in debug client, mocha --debug will allow you to use a different interface — such as the Blink Developer Tools. Implies --no-timeouts.
--globals <names>
Accepts a comma-delimited list of accepted global variable names. For example, suppose your app deliberately exposes a global named app and YUI, you may want to add --globals app,YUI. It also accepts wildcards. You could do --globals '*bar' and it would match foobar, barbar, etc. You can also simply pass in '*' to ignore all globals.
By using this option in conjunction with --check-leaks, you can specify a whitelist of known global variables that you would expect to leak into global scope.
--check-leaks
Use this option to have Mocha check for global variables that are leaked while running tests. Specify globals that are acceptable via the --globals option (for example: --check-leaks --globals jQuery,MyLib).
-r, --require <module-name>
The --require option is useful for libraries such as should.js, so you may simply --require should instead of manually invoking require('should') within each test file. Note that this works well for should as it augments Object.prototype, however if you wish to access a module’s exports you will have to require them, for example var should = require('should'). Furthermore, it can be used with relative paths, e.g. --require ./test/helper.js
-u, --ui <name>
该--ui选项允许您指定要使用的接口,默认为“bdd”。
-R, --reporter <name>
该--reporter选项允许您指定将使用的报告器,默认为“spec”。该标志也可用于利用第三方记者。例如,如果你npm install mocha-lcov-reporter可以这样做的话--reporter mocha-lcov-reporter。
-t, --timeout <ms>
指定测试用例超时,默认为2秒。要覆盖,您可以以毫秒为单位传递超时,或者使用s后缀ex:--timeout 2s或--timeout 2000等效的值传递。
--no-timeouts
禁用超时。相当于--timeout 0。
-s, --slow <ms>
指定“慢”测试阈值,默认为75毫秒。Mocha使用它来突出显示花费太长时间的测试用例。
--file <file>
首先在测试套件中添加要包含的文件。如果您有一些必须包含在测试套件中的通用设置代码,这将非常有用。传递的文件不受任何其他标志的影响(--recursive或--sort无效)。接受多个--file标志以包含多个文件,标志的给定顺序是文件包含在测试套件中的顺序。也可以用于mocha.opts。
-g, --grep <pattern>
--grep指定的选项将触发mocha仅运行与pattern内部编译为a 的给定匹配的测试RegExp。
例如,假设您有“api”相关测试以及“app”相关测试,如下面的代码段所示; 人们可以使用--grep api或--grep app运行其中一个或另一个。套件或测试用例标题的任何其他部分也是如此,--grep users也是有效的,甚至是有效的--grep GET。
describe('api', function() {
  describe('GET /api/users', function() {
    it('respond with an array of users', function() {
      // ...
    });
  });
});

describe('app', function() {
  describe('GET /users', function() {
    it('respond with an array of users', function() {
      // ...
    });
  });
});
接口
Mocha的“界面”系统允许开发人员选择他们的DSL风格。Mocha有BDD,TDD,Exports,QUnit和Require -style接口。
BDD
的BDD接口提供describe(),context(),it(),specify(),before(),after(),beforeEach(),和afterEach()。
context()只是一个别名describe(),行为方式相同; 它只是提供了一种让测试更容易阅读和组织的方法。同样,specify()是别名it()。
所有前面的示例都是使用BDD接口编写的。
  describe('Array', function() {
    before(function() {
      // ...
    });

    describe('#indexOf()', function() {
      context('when not present', function() {
        it('should not throw an error', function() {
          (function() {
            [1,2,3].indexOf(4);
          }).should.not.throw();
        });
        it('should return -1', function() {
          [1,2,3].indexOf(4).should.equal(-1);
        });
      });
      context('when present', function() {
        it('should return the index where the element first appears in the array', function() {
          [1,2,3].indexOf(3).should.equal(2);
        });
      });
    });
  });
TDD
的TDD接口提供suite(),test(),suiteSetup(),suiteTeardown(),setup(),和teardown():
suite('Array', function() {
  setup(function() {
    // ...
  });

  suite('#indexOf()', function() {
    test('should return -1 when not present', function() {
      assert.equal(-1, [1,2,3].indexOf(4));
    });
  });
});
出口
该出口界面很像mocha的前身快报。该键before,after,beforeEach,和afterEach属于特例,对象的值是套房和函数值是测试情况:
module.exports = {
  before: function() {
    // ...
  },

  'Array': {
    '#indexOf()': {
      'should return -1 when not present': function() {
        [1,2,3].indexOf(4).should.equal(-1);
      }
    }
  }
};
QUnit
该QUnit灵感的接口匹配QUnit,那里的测试套件标题简单的测试案例之前定义的“扁平化”的样子。像TDD,它使用suite()和test(),但类似BDD,还含有before(),after(),beforeEach(),和afterEach()。
function ok(expr, msg) {
  if (!expr) throw new Error(msg);
}

suite('Array');

test('#length', function() {
  var arr = [1,2,3];
  ok(arr.length == 3);
});

test('#indexOf()', function() {
  var arr = [1,2,3];
  ok(arr.indexOf(1) == 0);
  ok(arr.indexOf(2) == 1);
  ok(arr.indexOf(3) == 2);
});

suite('String');

test('#length', function() {
  ok('foo'.length == 3);
});
要求
该require界面允许您所需要的describe,直接用朋友的话require,并呼吁他们任何你想要的。如果要在测试中避免全局变量,此接口也很有用。
注意:require接口不能通过node可执行文件运行,必须通过运行mocha。
var testCase = require('mocha').describe;
var pre = require('mocha').before;
var assertions = require('mocha').it;
var assert = require('chai').assert;

testCase('Array', function() {
  pre(function() {
    // ...
  });

  testCase('#indexOf()', function() {
    assertions('should return -1 when not present', function() {
      assert.equal([1,2,3].indexOf(4), -1);
    });
  });
});
记者
Mocha记者调整到终端窗口,当stdio流与TTY没有关联时,总是禁用ANSI-escape着色。
规格
这是默认的记者。“spec”报告器输出一个嵌套的分层视图,就像测试用例一样。


点阵
点阵(或“点”)报告器只是一系列代表测试用例的字符。失败在红色惊叹号(!)中突出显示,待定测试用蓝色逗号(,),慢速测试用黄色突出显示。如果你喜欢最小的输出,那就好

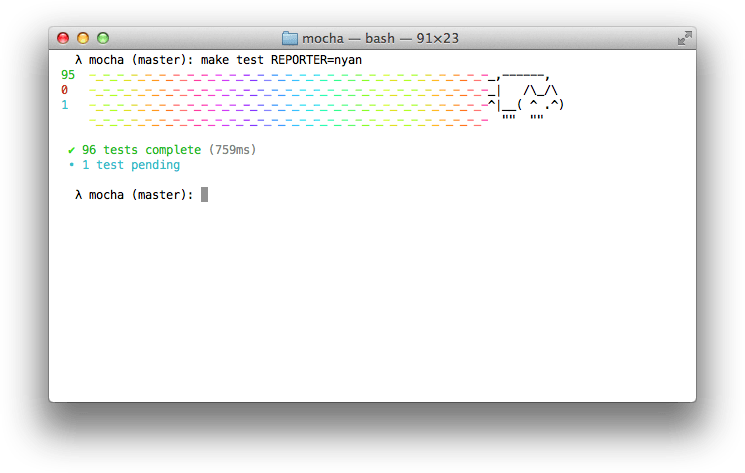
吴年
“nyan”记者正如您所期望的那样:
TAP
TAP记者为Test-Anything-Protocol消费者发出行。

降落跑道
Landing Strip(landing)记者是模拟飞机着陆的噱头测试记者:) unicode ftw


名单
当测试用例通过或失败时,“list”报告器输出一个简单的规范列表,输出输出底部的故障详细信息。

进展
“进步”记者实现了一个简单的进度条:

JSON
测试完成后(“失败与否”),“JSON”报告器输出一个大型JSON对象。

JSON流
“JSON流”报告器在发生新行分隔的JSON“事件”时输出,从“开始”事件开始,然后是测试通过或失败,然后是最终的“结束”事件。

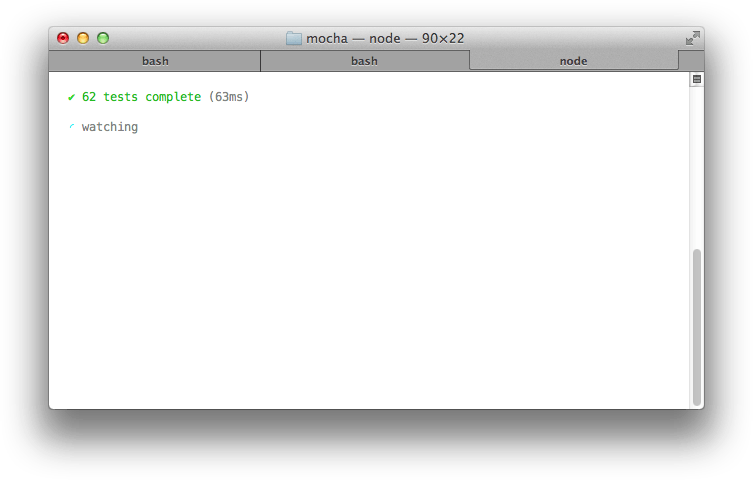
敏
“min”记者仅显示摘要,同时仍然在失败时输出错误。这位记者工作得非常好,--watch因为它清除了终端,以便将您的测试摘要保持在最顶层。
文件
“doc”报告器输出测试的分层HTML正文表示。用页眉,页脚和一些样式包裹它,然后你有一些很棒的文档!

例如,假设您有以下JavaScript:
describe('Array', function() {
  describe('#indexOf()', function() {
    it('should return -1 when the value is not present', function() {
      [1,2,3].indexOf(5).should.equal(-1);
      [1,2,3].indexOf(0).should.equal(-1);
    });
  });
});
该命令mocha --reporter doc array将产生:
<section class="suite">
  <h1>Array</h1>
  <dl>
    <section class="suite">
      <h1>#indexOf()</h1>
      <dl>
      <dt>should return -1 when the value is not present</dt>
      <dd><pre><code>[1,2,3].indexOf(5).should.equal(-1);
[1,2,3].indexOf(0).should.equal(-1);</code></pre></dd>
      </dl>
    </section>
  </dl>
</section>
使用此Bash命令,使用Mocha的doc报告生成了SuperAgent请求库测试文档:
$ mocha --reporter=doc | cat docs/head.html - docs/tail.html > docs/test.html
查看SuperAgent的Makefile以供参考。
降价
“降价”记者为您的测试套件生成降价TOC和正文。如果您想将测试用作Github wiki页面中的文档,或者Github可以呈现的存储库中的markdown文件,那么这非常有用。例如,这是Connect 测试输出。
的xUnit
该xunit记者也可用。它输出与XUnit兼容的XML文档,通常适用于CI服务器。
默认情况下,它将输出到控制台。要直接写入文件,请使用--reporter-options output=filename.xml。
第三方记者
Mocha允许您定义自定义记者。有关更多信息,请参阅wiki。一个例子是TeamCity记者。
HTML Reporter
HTML报告器不适用于命令行。
在浏览器中运行Mocha
Mocha在浏览器中运行。每个版本的Mocha都将拥有新版本./mocha.js并./mocha.css在浏览器中使用。
特定于浏览器的方法
以下方法仅在浏览器上下文中起作用:
mocha.allowUncaught() :如果被调用,错误处理程序将不会吸收未捕获的错误。
典型的设置可能类似于下面,我们呼吁mocha.setup('bdd')使用BDD加载测试脚本,运行之前的界面onload与mocha.run()。
<html>
<head>
  <meta charset="utf-8">
  <title>Mocha Tests</title>
  <link href="https://cdn.rawgit.com/mochajs/mocha/2.2.5/mocha.css" rel="stylesheet" />
</head>
<body>
  <div id="mocha"></div>

  <script src="https://cdn.rawgit.com/jquery/jquery/2.1.4/dist/jquery.min.js"></script>
  <script src="https://cdn.rawgit.com/Automattic/expect.js/0.3.1/index.js"></script>
  <script src="https://cdn.rawgit.com/mochajs/mocha/2.2.5/mocha.js"></script>

  <script>mocha.setup('bdd')</script>
  <script src="test.array.js"></script>
  <script src="test.object.js"></script>
  <script src="test.xhr.js"></script>
  <script>
    mocha.checkLeaks();
    mocha.globals(['jQuery']);
    mocha.run();
  </script>
</body>
</html>
grep的
浏览器可以使用--grepas功能。在您的网址中附加查询字符串:?grep=api。
浏览器配置
可以通过设置mocha选项mocha.setup()。例子:
// Use "tdd" interface.  This is a shortcut to setting the interface;
// any other options must be passed via an object.
mocha.setup('tdd');

// This is equivalent to the above.
mocha.setup({
  ui: 'tdd'
});

// Use "tdd" interface, ignore leaks, and force all tests to be asynchronous
mocha.setup({
  ui: 'tdd',
  ignoreLeaks: true,
  asyncOnly: true
});
特定于浏览器的选项
以下选项仅在浏览器上下文中起作用:
noHighlighting:如果设置为true,请不要尝试在输出测试代码上使用语法突出显示。
报告
“HTML”报告器是您在浏览器中运行Mocha时看到的。它看起来像这样:

Mochawesome是默认HTML报告器的绝佳替代品。
mocha.opts
回到服务器上,Mocha将尝试加载"./test/mocha.opts"为各种运行控制文件。
提供初级评论支持; 任何以哈希(#)符号开头的行都将被视为注释。也可以使用空行。任何其他行将被视为命令行参数(以及任何关联的选项值)以用作默认设置。每行应指定一个设置。
此文件中的行前置于任何实际的命令行参数。因此,实际的命令行参数将优先于默认值。
例如,假设您有以下mocha.opts文件:
# mocha.opts

  --require should
  --reporter dot
  --ui bdd
上面的设置将默认报告者dot,需要should库,并bdd用作接口。有了这个,您可以mocha使用其他参数调用,这里启用Growl支持,并将报告者更改为list:
$ mocha --reporter list --growl
test/目录
默认情况下,mocha查找glob ./test/*.js,因此您可能希望将测试放在test/文件夹中。如果要包含子目录,请使用--recursive,因为./test/*.js只匹配第一级中的文件,test并且./test/**/*.js只匹配第二级中的文件test。
编辑插件
下面的编辑器插件package可用:
TextMate
Mocha的TextMate包包含了能够加速测试编写的代码片段。
JetBrains
JetBrains为它们的IDE套件(IntelliJ IDEA,WebStorm等)提供了一个NodeJS插件,包含了一个Mocha test runner,和一些周边。
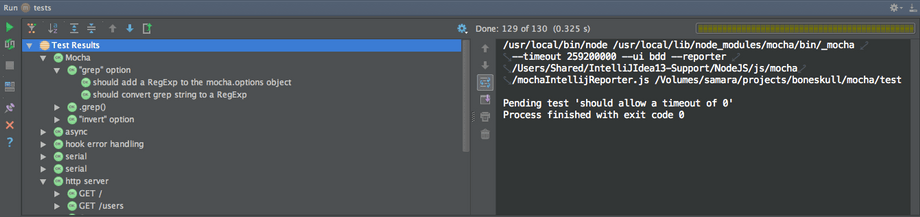
该插件名为NodeJS,可以通过Preference > Plugins安装,如果你的许可允许的话。
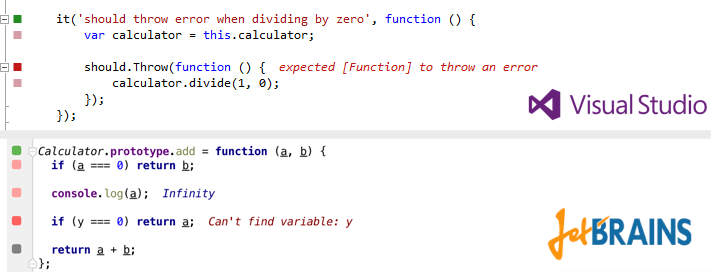
Wallaby.js
Wallaby.js是一个连续的测试工具,可以使用VS Code,Atom,JetBrains IDE(IntelliJ IDEA,WebStorm等),Sublime Text和Visual Studio中的任何断言库为浏览器和节点实现Mocha的实时代码覆盖。 js项目。
Emacs
Emacs支持通过第三方插件mocha.el获得来运行Mocha测试。插件可以在MELPA上找到,也可通过M-x package-install mocha来安装。

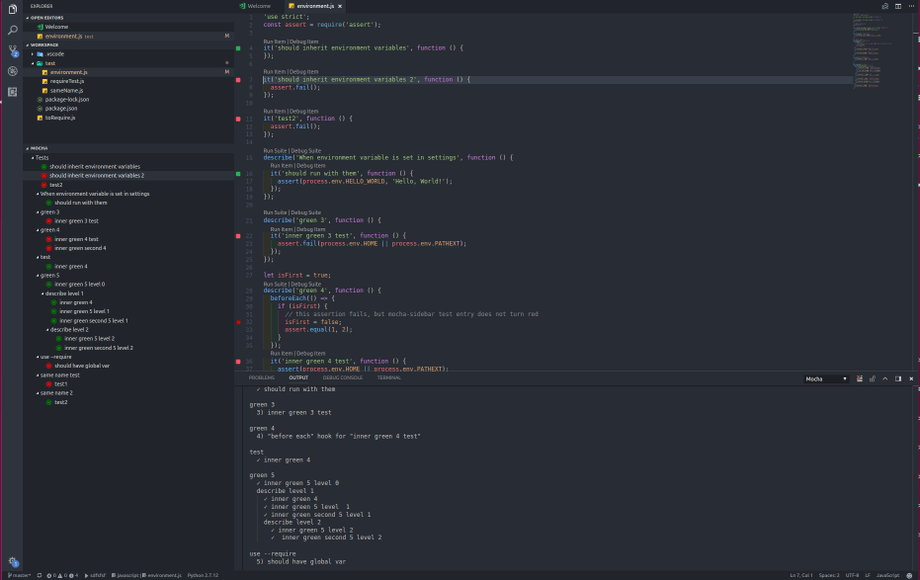
mocha边栏(VS代码)
Mocha侧边栏是vs代码最完整的mocha扩展。
特征
- 查看VS Code侧栏菜单中的所有测试
- 运行和调试每个级别层次结构的测试,从所有测试到单个测试(当然每个描述)
- 自动运行测试文件保存
- 直接在代码编辑器中查看测试结果
例子
实例代码:
测试mocha
要运行Mocha的测试,您需要GNU Make或兼容; Cygwin应该工作。
$ cd /path/to/mocha
$ npm install
$ npm test
要使用其他记者:
$ REPORTER=nyan npm test
更多信息
除了在Gitter上与我们聊天外,有关使用间谍,模拟和共享行为等其他信息,请务必查看GitHub上的Mocha Wiki。有关讨论,请加入Google群组。有关Mocha的运行示例,请查看example / tests.html。对于JavaScript API,请查看API文档或源代码。